Hi,
So I decided to try my hand at making a fantasy map for a D&D campaign. It's been a few years since I'd done one. Now that I'm finished with it in Photoshop I thought "hey why not take it a step further and turn it into a 3d model".
My only real goal here is learning to take it from 2d to 3d and then look at it for my own enjoyment. Maybe pop a few town models in. Who knows.
I've spent the last several days reading as much as I can on height maps. As I understand the concept, you take a gray scale image, import it into a 3d modeling program (I have blender 3d, World Builder and some others) and generate the heights from the relative white to black in the image. I've had no problem doing this with pre-existing height maps. Obviously I had none involved in making my existing map in Photoshop. The land shading on the photoshop file is currently accomplished by the difference cloud shading sort of thing so obviously that won't do well to actually match the mountains and landscape elements (which are painted on with brush sets) as a height map. I'm assuming that I have to create a height map from scratch since I didn't use any references to existing height maps. Everything I find indicates that models are made from/based around randomly generated difference clouds to greyscale files whereas I need a height map that matches my map outline/features.
Which brings me to my question: How does one make a height map from scratch? Because several days of googling doesn't seem to indicate that anyone does that, which seems unrealistic because surely there is someone that does and/or has. I've found countless How-To's that use existing height maps but none that show how to make your own (outside of convert an image to grey scale and pray).
My really rudimentary understanding of the process is: create height map -> generate terrain from height map --> fool around with the generated model --> import model into some other program that makes grass and trees and what not --> fool around with that --> enjoy.
So...how would I go about doing this? Or am I going about this all wrong?
Thanks in advance for any help.
Last edited by fifthmanstanding; 02-21-2017 at 12:28 PM. Reason: clarity
Thanks for that!
So in your opinion is taking it to paper and pencil the best way to tackle this? I know for a fact I don't have the technical skill or topography knowledge to draw a convincing topographic representation off the cuff and I'd imagine that digitally drawing out a height map would not only be difficult but also look pretty bad once I import it to 3d.
Alternatively, would finding height maps for islands/land elements, snatching those and popping them into the pre-existing map outline work? I would think that this would work with a .png given the transparency and ability to layer them over top of one another but (in addition to requiring what I'd guess to be a lot of cleanup) would require a lot of "stitching" them together to get a working image.
I was playing with world builder today and hoping that I could pop in an image of the outline and just build the land mass from there but I'm having real difficulties getting the image to work.
Last edited by fifthmanstanding; 02-21-2017 at 01:05 PM. Reason: clarity
You absolutely can use existing heightmap bitmaps to make up some terrain. The issue tho is whether you want to use something that matches up with your map design or whether you can stand random terrain. What I have done in the past quite successfully is to make the base terrain using the above form or similarly done digitally and then get a base height map for it. Then you can add on top some real world terrain.
Its a bit of a faff but I got hold of some NASA height map data - in our case we needed realistic mountains so used SRTM data - and cut out many swatches of mountainous regions. Then we blended loads of swatches together into one giant heightmap texture of mountains. Then I removed the low frequency components of it so that the height map is basically flat but with nice jaggies of rock texture to it. At the same time I made it seamless but thats an optional stage. Then I apply that mountain height map texture with a mask against my created by contour base texture where I want the mountainous bits. So I can paint 3D mountains by painting the 2D mountain mask using a normal image editor.
You can repeat that process with other terrain types too.
The only gotcha you have to be careful of is that its better if the mountain texture valleys line up with your base valleys so that rivers look nice. But you can always blend the mask in over a bit of a distance and then it doesnt matter so much. A program like Wilbur can always extract your river system from that height map for you.
I printed mine only because I can use a pen better than a pen tablet. Theres no other reason. Getting a terrain generator to make terrain in a specific shape is really hard. My method or something similar is the best I have seen anyone do. Once you have the basic shape its much easier to get a terrain generator to evolve it a bit more and make it keep the outline somewhat similar. And being aware of some of the basics of geology / geomorphism does help a bit to get your contours looking plausible. If you have some trouble with rivers then I have a bigger tut on that too:
https://www.cartographersguild.com/s...ead.php?t=3822
That tut may aid you in placing the contours so worth a sundry read I think.
Edit: Oh I need to mention something else too. If a PNG has some transparency then it can be made to blend. What will happen is that one bitmap image blends into another. A better approach is to put the two swatches of height map that need to be blended on two layers so that they overlap and use a function of brightest instead of a blend. Not sure how you do that for specific apps but my old image editor used to be able to do it ok. I think Gimp can do it somehow and if not I think there is a plug in for math operations on image layers. But anyway, brightest of two images is better than blend.
Last edited by Redrobes; 02-21-2017 at 01:56 PM.
https://cartographersguild.com/showthread.php?t=29412 offers suggestion from the school of the extremely lazy.
https://www.cartographersguild.com/s...ad.php?t=32916 might also be of interest, as might https://cartographersguild.com/showthread.php?t=33087 starting a couple of pages in.
That Fun With Wilbur #4 black and white coastal thingy looks exactly like what I'm looking for. I'll give that a whirl. Thanks so much to both of you.Originally Posted by waldronate

Edit: Actually I've screwed something up somewhere. I have the original map as a .psd in two layers (black background and white land mass over top). I save that as a .png and try to load selection in wilbur and it pops in an outline of the actual land mass on top of the blue plain with no contents. It in no way resembles the images from the tutorial and I've tried this twice. The original psd is in RGB color and 8 bit. I don't know if it's interpretting the file badly because of my settings. As I continue the tutorial it will turn into a green land mass with no resemblance to the tutorial images.
The first image is when trying with a jpg and the second is with a png

Last edited by fifthmanstanding; 02-21-2017 at 02:45 PM.
The dotted outline thing is the selection. You can use a mounds from there or just fill with a constant value. The first image looks exactly as I would expect from a JPEG: white at the highest altitudes, green for just above 0 (needs to be 0 or less to get the base blue water color).
The first picture in tutorial 4 is the mask (probably what your JPEG looks like). The blue image with the dotted element is what it should look like just after you loaded the selection. The next image in the tutorial is the mound dialog and the one after that shows the result of the mound.
That tutorial was one of the very first ones I did when trying to get a terrain from a simple mask. I recommend the CSU Johnsondale tutorial if you're willing to put together two masks (coast and mountain). The "Something newish" tutorial toward the end of the first page shows how to start from a map of what you want, make a couple of masks, and the run processing to get a result (I recommend this one as it has the process in excruciating detail with pictures).
yes and noI've spent the last several days reading as much as I can on height maps. As I understand the concept, you take a gray scale image, import it into a 3d modeling program
this is one of my "pet peeves" so
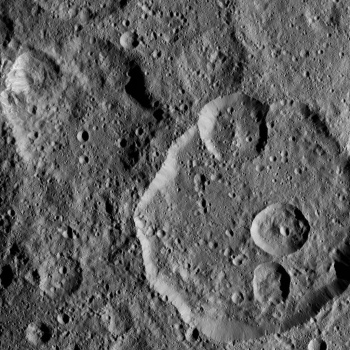
if a black and white copy of a shaded relief map is used the results will be very bad
an example from the Dawn data of the minor body " Ceres" i have been working on
a black and white image
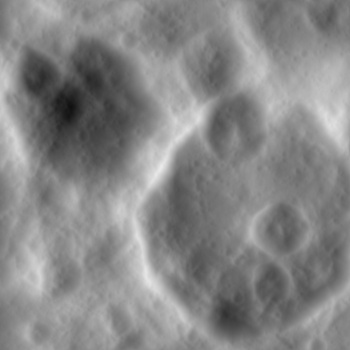
and a height map generated from a single image using "Shape from Shade"
-- 8 bit copy of the 32 bit tiff
the darker the tone the farther away it is ( lower) the brighter the higher the height
you REALLY!!!! want to use a 16 bit unsigned or signed
or
use 32 bit float image format for the height map
--- 90 seconds to Midnight ---
--------
--- Penguin power!!! ---
I figured I should update just in case anyone else finds this while looking for a resolution to their issue.
I followed the instructions of the wilbur tutorial referenced above and while it did technically work, it added features that didn't match the map itself. While this is in no way wilbur's fault I had to keep in mind that I was building this for someone else and that it should match.
What I did find out that I was able to do (over the course of about 3 more days of searching) is use World Machine's file input device to load an image into the layout generator.
In this case you drop a file input device, double click and load the desired file from the menu. I used a .BMP of a stroke of my photoshop file's map outline. The file has to be a bmp because apparently it doesn't play nice with jpg or png at least when I attempted. Then wire the input's primary output into a layout generator device's terrain input. Go back to File Input, double click and click the "Set In Layout" button. From there it will lay the .bmp outline into the layout generator and take you directly to it.
Note that if you exit this layout generator screen it will undo the Set in Layout Function and you will have to do it again each time you exit.
From there it's just a matter of using the polygon tool to trace the outline to create the continental shapes, which took me some time.
I did find that the best method of working with the continents was to create multiple copies of that same layout generator that contained all of my polygons and delete individual polygons within each one such that one layout generator device was Continent A where another was Continent B and so on. Not only does this significantly reduce the strain on the cpu (cuz by the time I was finished creating the polygons it was taking 1-2 minutes just to zoom out) but it allows you to treat each continent as a separate workflow before merging all of the individual continental workflows back together at the end using a series of combiner devices.
You guys that have responded probably know this already but I thought it would be good info for anyone like me that was both lost and new to most of 3d modeling and had the same thought/issue.
Thank you all for your help!
Last edited by fifthmanstanding; 02-25-2017 at 03:04 PM.

this is a houdini erosion test. Pretty snazzy considering the effort is near zero once you find the buttons. Used a free license educational copy.
The colors are not intentional, The ocean needs to be created. lots missing.


 Reply With Quote