Thanks for the help... but I confess I don't really understand, Mouse...
Are you talking of some filter? Like adjust light/contrast?

I tried something, but I'm too much in awe of you to upload the result, as it seems to me to be extremely rude to mess with the work of another artist, but...
If you play with the levels to take out the wasted blank bits of the scale on the levels graph (move the light and dark arrows together so that they neatly enclose the bit of the graph where there is something registering in the middle), and then adjust the position of the grey arrow closer to the white arrow to increase the contrast of the image generally...
Then ok that and desaturate the result by careful degrees until its about the same saturation as it started out (since messing with the levels makes everything more saturated), you get a really nice result. I think it might even be what you seem to be trying to achieve the hard way by hand
PS - you'd have to do this to a single layer to see what I've seen, so first you'd need to make a new layer from visible
Free parchments | Free seamless textures | Battle tiles / floor patterns | Room 1024 - textures for CC3 | GUILD CITY INDEX
No one is ever a failure until they give up trying
Thanks for the help... but I confess I don't really understand, Mouse...
Are you talking of some filter? Like adjust light/contrast?
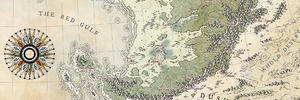
For what it's worth, I think your experiments in the red circles are an improvement over what's there before. I think it 'pops' just as much, and I like that the slight brown tint separates the mountains from the surrounding landscape.
Wingshaw
Formerly TheHoarseWhisperer
I'm absolutely terrified I'm going to upset a lot of people with this comment on your beautiful challenge thread - not least you, Ilanthar. And I do so admire your work! So please delete this comment once you've read it.
In GIMP (and I'm sure there is an equivalent in PS) if you click the colour menu item and pick "Levels" you get this graph dialog thing. I've numbered the three arrows I was talking about above. 1 is the black arrow, 2 is the white arrow, and 3 is the grey arrow.
These I adjusted as shown here:
And then of course I had to take the saturation back down to somewhere close to where it started out, using the HSL adjustment dialog - again from the colour menu.
EDIT: of course I realise this might be totally the opposite to what you want to change about your map, and if it is I apologise profusely. I just wanted to explain what I meant, as I didn't think it was fair to just leave you hanging like that.
As a side note: This technique never usually works as well as this. The only reason it looks so good (to me) here, is because your drawing and shading is already simply superb - as ever. Exaggerating the levels has a tendency to exaggerate mistakes every bit as much as it exaggerates the good bits, but you never seem to make any mistakes at all, no matter how subtle your palette and lines. Its just incredible - your drawing skill
Last edited by Mouse; 01-21-2018 at 01:06 PM.
Free parchments | Free seamless textures | Battle tiles / floor patterns | Room 1024 - textures for CC3 | GUILD CITY INDEX
No one is ever a failure until they give up trying
Mouse idea is a pretty good one but it also darkens and thickens your linework. Have you tried, using your color layer for the mountains, duplicating it and using lower opacities layers with color burn and multiply blending modes ? Also, the last image of Mouse's post shows a grass color that seems to fit the map and that you could achieve by the same process.
Once you get the color you want, if the shadows do not seem right (I'm sure you kept all your shades on only one layer, am I right ?) you can duplicate the shadow layer and play with the blending moss and opacity once again. My best bets are overlay and soft light but if you wanna change the balance between shades and highlights, you can always play with the others mode. A simpler way could be to isolate the shades and highlights on separate layers (if you've not already done it).
Thanks - again - a lot for the explanation & comments, guys
I'm feeling privileged with such a backup.
@Mouse : I'm doing this map on Krita (except for labels). I did find something similar in Krita, but... it's kinda weird in comparison. And WHY would I delete such a helpful comment? It's probably gonna be useful to others as it is to me (thanks for teaching me this
@Wingshaw : Yup, I hear you.
@Thomas : thanks for the help (as usual
I duplicated the shadow layer on the mountain and think it's already a lot better.
### Latest WIP ###

Ah! No wonder the translation was a little bit confusing. I don't know why, but I always think of you as a PS user!
I wasn't sure that a Main Challenge thread was really an appropriate place to start harping on about levels and such like, but I'm happy that you are ok with it
And you are right - Krita's levels manipulator is definitely a bit weird in comparison with GIMP!
Your map is splendid enough as it is, but I would say you are going the right way by doubling the shading on the mountains if what you were wanting to do was to increase the 'pop' effect. Its not very visible in this version. Maybe try Burn, like Thomas suggested, or even a Grain merge (which has this lovely chocolatey reddish brown effect - adjustable by degree of opacity of course)
Free parchments | Free seamless textures | Battle tiles / floor patterns | Room 1024 - textures for CC3 | GUILD CITY INDEX
No one is ever a failure until they give up trying


I am very impressed by many of the maps in this challenge but I really like your style, Ilanthar. I think the map looks somewhat flat when it's zoomed to all fit on the screen, but at actual pixel view the detailing and the contrast works so well. This is where Mouse's levels comment may come from, sorry if I misinterpreted.
Anyway, a quick comment on Mouse's procedure for changing the threshold. I don't know Kitra or Gimp, but at least in the later versions of Photoshop you can just add adjustment layers on top of the stack for levels and saturation and others. This way you don't have to flatten your layers first and you can mask off certain portions to apply the effects.
looking nice
--- 90 seconds to Midnight ---
--------
--- Penguin power!!! ---
Thanks guys!
Done another test about the mountains. I've also done the heraldry and added some global shading to the lands.
### Latest WIP ###
Truth be told, I'm not really satisfied wih the labels... I will probably try to add more and reduce the size of some... maybe change the font.
 Posting Permissions